Twitter has been a godsend for me since I joined in Spring of 2014. I was finishing up my master’s degree and finally caved to joining social media. I was blown away by the amount of information being freely shared through the #physed hashtag. I had access to lesson plans, new tasks, and cutting-edge technology. It was a pipeline for professional development 24/7.

How to Use Plickers in PE
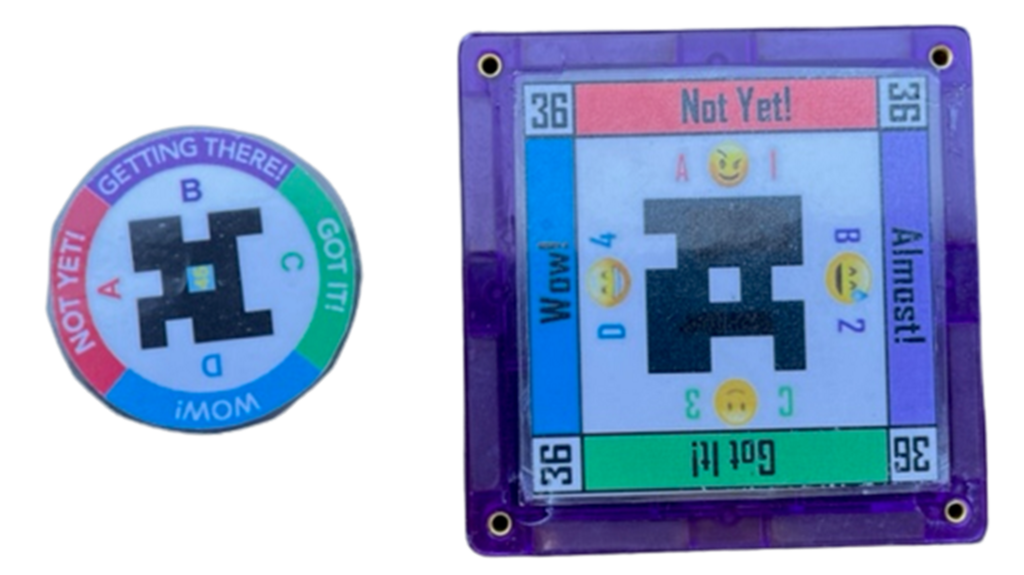
One of the things that I found on Twitter was Plickers. Plickers are basically individualized QR Codes that can allow your students to answer A-B-C-D questions. The Plickers system has 63 unique cards and a teacher can use an phone or tablet scan the classes cards using the Plickers app. The cards can be purchased from Amazon or you can download the cards directly from the Plickers Website for free. Each card has a unique number with each number being assigned to a specific student. On the original cards, you can see that the student number is placed on each corner of the card.

Each card has a letter on the card that represents A-B-C-D. Students can select an answer to a prompt you share with them by rotating their Plicker with the cooresponding letter facing to the sky (Upward)
The picture below would show the letter B as the answer.

The picture below shows the same card selecting the different answers (A-B-C-D). The app is able to determine what each student answered because the QR code is different for each card.

Scanning Plickers to Collect Student Data
This is a great assessment tool that requires little technology! The students can hold up their unique card and the teacher can use a single device (their own cell phone if needed) to scan the cards. A scan can take a few seconds per class as long as the cards are scanning clearly. If a student blocks part of the QR Code with their finger it will not scan. I’ve also had some issues with the glare of the sun or lights from the lamination. When I notice this happening, changing positions on my cell phone (scanning) is an easy fix or the student could also tilt their card to fix the glare.
When I introduce Plickers to my students I use an indoor classroom and project some items on the screen. It makes it a little easier to explain and demonstrate how to use them properly. After giving them a basic overview and handing out the cards, I start by asking them a few simple questions. In these two questions I am certain that most of my students actually know the answer already. I’m really looking to see if they understand how to use the cards correctly.

How to Create your Own Plickers
Back to Twitter, I think Joey Feith was the first person to write about using magnets to track student progress using SOLO taxonomy. Someone else then came up with the idea of taking the Plicker card, making it smaller, and placing it on a magnet. Originally the magnet was round but it made it difficult to scan because students could place their Plicker cards at an angle and it wouldn’t allow the cards to scan. Eventually, someone came up with the idea of putting the Plicker card on a Magna Tile (magnet) and “Plagnets” were born (Plicker Magnets).
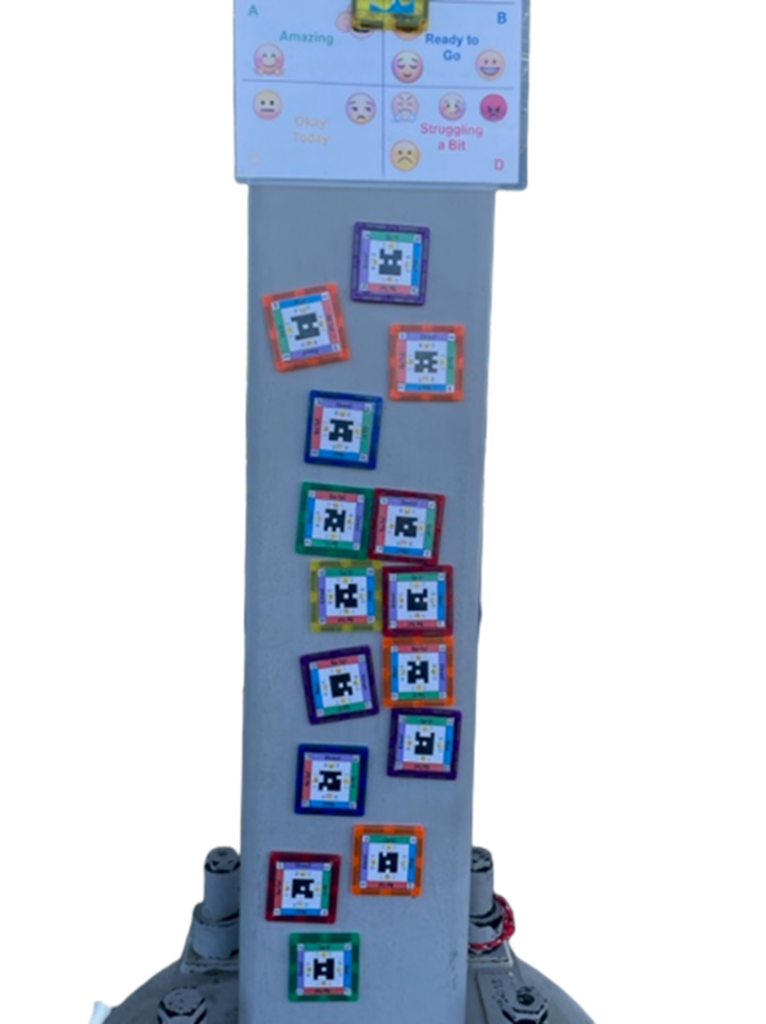
As an outdoor teacher (I work in Southern California), I spend most of my time outside. The physical cards are nice but the magnetic cards allow me to have the students place the cards onto any magnetic surface. If you are looking to add these magnets to your program, make sure the box that you order has enough square tiles to accommodate your class size. This isn’t always easy to determine and I’ve had to look in the comments to learn how many square magnets are in the set. One big reason that I like to use the magnets is that I can have the students place the cards on the side of our solar panel posts. If you do create your own Magnetic Plicker cards, I would suggest that you first laminate your Plicker cards and cut them out. After, use modge podge (thank you to my art teachers for this suggestion) to glue them to the magnets. Use a non glossy version of the modge podge.

Suggested Uses for Plickers in PE
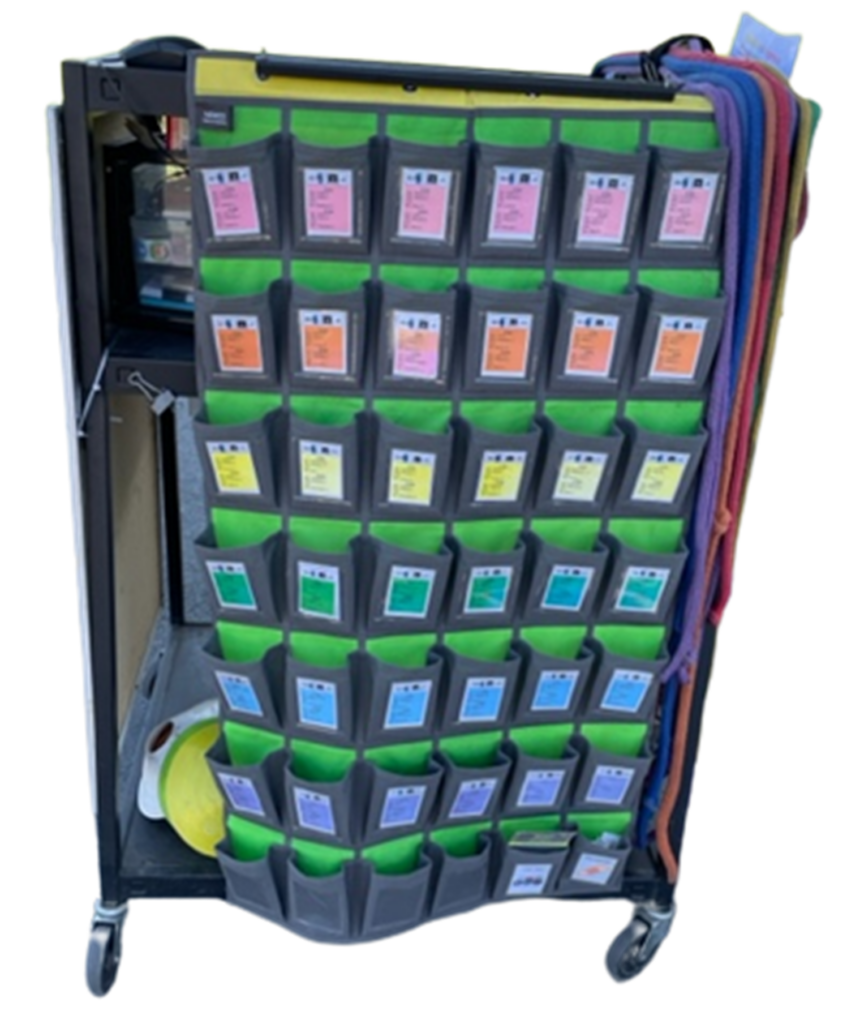
I use my Plicker/Plagnet cards almost daily with my fourth through eighth grade students. The students go to their pocket chart to pull their card out and place them onto the magnetic pole. After everyone has picked up their card, I go back to the pocket chart and look at the cards that remain. These are the students who are absent. This can take about 30 seconds to accomplish with my classes of 36 and I can check roll when it’s convenient during warm up.


One pitfall is getting the student to remember their Plicker card number. I attempt to use the same number for their classroom (if they have one) to simplify the process. I have started to use this pocket chart from Amazon and hang on an old TV cart. To avoid having the issues of students constantly asking about their number I created the following cards that are placed into the clear pockets outside of the pocket cart. Students can then look up for their name based on the class. You will see that this student is Plicker #40 (upper right). I also use the IHT system and their HRM number is on the upper left.

Plickers for Student Check In
Coming back from teaching online, I’ve started to use the Plicker cards as a Social Emotional Check In. The students can see the following picture (sign laminated and placed on my solar panel poles). They share how they are feeling with me as they start class. As I move the class into their warmup, I can go back to scan the cards using my cell phone. After scanning, I look for those students who have listed they are struggling today. I will call those students over one by one and ask how they are doing. It gives me time to check in with my students and help them. It wouldn’t be difficult for a teacher to do the same check in at the end of class to determine how their class went.

If you are interested in creating your own Plicker cards you have to be willing to take a lot of time developing the template and then building each individual card. The good news is that teachers from around the world have already created numerous examples. These examples can be found here. The big thing you will want to check before getting started is that the set you selected has the correct number of cards for your situation. It would be a shame if you spent the time printing out a set of cards only to realize that it was not going to meet your class size needs. This link also provides a lot of tutorials and help to get you started.
I have continued to use the free version of Plickers myself. If you want to upgrade to Plickers Pro you can receive extra data that you can keep for longer times. I am a big proponent of assessing my students. I personally use Google Forms for cognitive assessments but you need to have enough devices to make it feasible. In the event that you do not have access to these types of devices the Plickers system is a great choice for you. It’s a great tool for you to assess your students, take roll and complete a social emotional check in for your students. To get started, go to Plickers.com!
Join the Conversation!
Do you use Plickers in #PhysEd? Join the conversation by sharing your thoughts in the comment section below!


