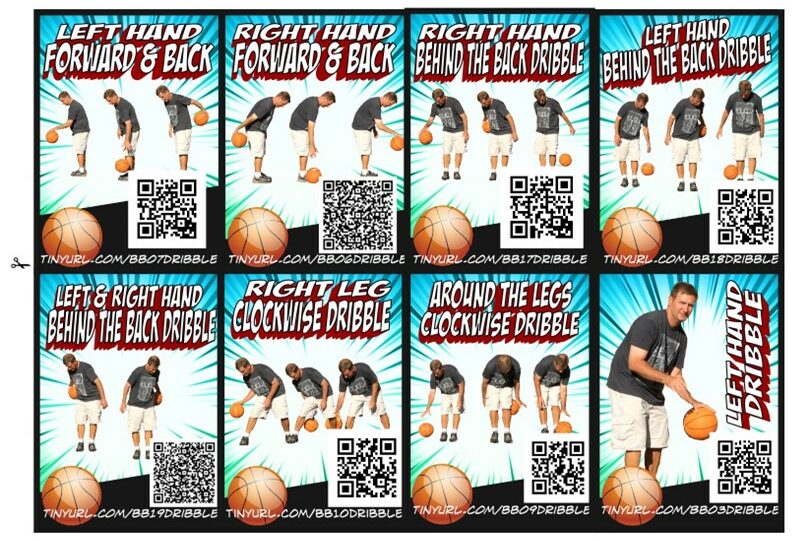
Basketball is one of my favorite sports. I was able to learn the fundamentals from some amazing coaches over my time in middle school and high school. Ball handling was not something that came natural to me as a player. I remember spending long periods of time in middle school working on developing my ability to dribble with my left hand and changing directions.
As a techie, I’ve always looked into using different forms of technology to help students learn skills. Teaching ball handling seemed like a great opportunity to use tech to provide additional instruction and help lessen the load as a teacher.
Here are a few visual elements I created for my basketball unit:
Basketball GIFS:
I notice that many of my students could still use some help developing dribbling skills. Students are visual learners and it’s difficult learning how to perform a skill without seeing it done first. I had the idea of creating a GIF to help them see the dribbling skills over and over so I recorded myself demonstrating a wide variety of stationary dribbling activities.

I’d recommend using a mobile or tablet device to record videos that you can later turn into GIFS. A GIF is an image file but it splices a lot of pictures together and loops them. In essence the GIF becomes a looping video.
How to Create a GIF:
With my university jobs, this is a technology skill that I expect the university students to learn. I use a website called ezgif.com. In addition to making the GIF you can also use the website unscreen.com to remove the background from the GIF. This can make your projects look even better. The key to a good GIF is lighting and attempting to record in front of a single-colored background. You’ll also have better luck if you use a tripod or prop your camera on a table to record a very still video. It makes it easier for the website to process the GIF. If you’d like to learn how to make your own, take a look at the slide deck below. In the end, I created more than 20 different GIFs for my students!
Sharing GIFs with Students:
My first attempt I simply placed the GIFs into Google Drive and created QR codes for the students to view. Sadly, this stopped working so I went back to the drawing board.
My second attempt had me take the GIFs and insert them into a Google Slide. I then learned how to “Publish to the Web” so the GIF acted like a single page website. My students could access the individual GIF they wanted to try.
Using Basketball Cards for Instruction:
After all of the GIFs were created, I went to work developing my basketball cards using a program called Comic Life. I took screenshots from my GIFS and removed the background using a great website called remove.bg. To make it more accessible for my students (We had not started using Google Classroom yet), I created QR Codes and tinyurl for each basketball card.

I ended up color coding the cards a few years later. I decided to give the “basic” level a specific color, “intermediate” a second color, and “advanced” a third color. The goal was to help the students see the cards they should be working on based on their own personal level.
When I use them with my students, I have my laminated basketball cards on a bench or the basketball pole and an iPad handy for them to use. The students then scan the desired card and see the looping GIF show them the skill. I don’t expect my students to scan the same card twice as they will have learned how to perform the skill.
At this time I’m usually in a different station most likely working on an assessment. The cards allow me to provide digital instructions to challenge the students at a developmentally appropriate level.

Other Uses for Basketball GIFs:
Developmental Posters:
One day I was preparing to use my basketball cards and started to think about other ways to use the cards to my advantage.
First, I decided to use them for developmental posters where students could select one of six different tasks. This turned out to be an awesome station activity. The best part? It gave my students the freedom to choose which task they wanted to tackle. No more one-size-fits-all! They could work on skills they were most interested in or wanted to improve. It was like hitting two birds with one stone: skill development and student engagement.

Basketball Dice Activity:
As I brainstormed some other ways to use these skill cards, it hit me – why not use dice to add a bit of a twist to how they pick the skills they work on.
I haven’t tried this yet, but I’ve been wanting to use Gopher’s ACTIVE! TossUp Dice to place the cards inside of the TossUp dice to add a fun element of unknown to the ball-handling activities.
By bringing dice into the mix, we turned our basketball practice into a fun activity. It was a reminder that even the smallest tweaks can make learning more engaging and enjoyable for the students. Who knew that a simple roll of the dice could add so much fun?

Create a game out of it!
Last, I thought of gamifying the activity. I wanted the students to have some fun with it, so I came up with the idea of a Tic Tac Toe board featuring our trusty basketball cards.
Here’s how it works: the students can either partner up or form teams. Then, it’s off to the Tic Tac Toe board. They place their markers on the square they want to conquer, and they’ve got to perform the corresponding skill for ten repetitions.
Students can scan the QR code before the start of the game to help refresh them on the skills they’ll need to perform. This gamification approach breathed new life into our basketball activities. It turned a simple practice session into a thrilling game where strategy, skill, and teamwork came into play. Plus, the QR codes added that extra layer of support to ensure everyone was on the same page.
If you’d like a copy of any of these basketball cards in it’s various iterations, please take a look at the links below.


2 Responses
This was very helpful. Now I need to learn how to do this for my PE classes. Thank you!
Creating GIFs are super easy. I use the website ezgif.com and load them onto Google slides most of the time.